One of many options to treat for Verroa Mites

To treat or not to treat for verroa mites is a big discussion….even bigger is the type of treatment to use. Opinions and judgement run high when a group of beekeepers have this discussion. Some feel that any treatment is a foul against nature, others take it as just part of what it takes to successfully raise bees. The good news is that you get to choose for yourself how you work with your bees. The point that I want to make is that you need to know your options before you can make an informed decision. Choose what is good for you and don’t get too judgy about what others are doing.

Hopguard® II revisited

By Dr. Elina L. Nino, Extension Apiculturist. UC, Davis, reprinted from the current newsletter

Every time I talk to beekeepers here in CA, I hear, “Boy do I wish we had more options for

treating Varroa”. Well, the good news is that this February, California has re-approved Section 18

emergency use of Hopguard® II. Eric Mussen has briefly written about this product in the past,

but a couple of papers that came out last year have prompted me to revisit this topic. Hopguard®

II is basically an “old” product developed by BetaTec Hop Products Inc (developed in

Washington state – Editor) but it has an improved delivery system. The active ingredient is the

Potassium salt of hop beta acids at 16% and yes, these are the same hops you would use for

making beer.

Hopguard® II can be applied to both packages and colonies and since it can’t reach the mites

on brood, the suggested timing of the treatment is when there is minimal brood in the hive so the

mites can’t “hide”. It sounds to me like packaged bees might be an ideal time to treat. If your bees

are already in a hive try to treat early in the season when the brood is just building up or late in

the fall when brood starts tapering off (BUT don’t wait too long as you don’t want your colonies

to succumb to Varroa).

2- or 3-lb packages should be treated by attaching 3 half strips inside a package so they hang

from the top and should remain in the package (with bees, of course) for at least 48 hours. Hives

need to be treated at a rate of 1 strip per 5 frames covered with bees and the treatment should only

be applied in a BROOD CHAMBER. The strips are easy to apply. Just hang them over a frame in

the middle of the brood box. If using 2 strips, the other strip should be placed on a neighboring

frame but 4 inches away from the first one.

Now just a couple of cautionary notes. Even though the product is safe to use during nectar

flow, DO NOT apply it in the honey supers. And please don’t be tempted to use honey or wax

that is in the brood chamber! If the bees do not remove strips after 30 days, you should remove

them from the hives. Hopguard® II can be used up to 3 times per year but it shouldn’t exceed a

total of 6 strips per year per colony (including package and hive application). You need to wear

chemical-resistant gloves when you’re working with the strips and since the material is pretty

sticky you’d probably want to wear them anyway.

So how do all these recommendations fare in the real world? A study by DeGrandi-Hoffman

and colleagues (2014) investigated the effect of Hopguard® on Varroa counts in commercial

colonies established from packages or splits. They used a mathematical model to determine the

timing of Hopguard® applications and at the end they compared Varroa counts predicted by the

model and what they actually found.

To show the timing of the applications I thought it would be best to do this in a table, so here

you go:

aa Table for Hop Guard2015-03-08_1739

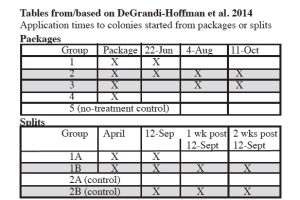
All of the mite counts were done with a sugar-shake method and reported as # mites/100 bees.

For packaged bees, the final mite counts were done after the October treatment and significantly

lower mite counts were recorded for groups 2 and 3. For colonies made from splits, the lowest

mite counts in November were recorded in groups 1B and 2B.

Interestingly, the model predicted a much more effective mite knockdown by the fall than what

was actually seen in the field. The authors hypothesize that these difference might have been due

to various other factors not taken into account by the model or various model parameters not

following what was recorded in the literature, underestimation of initial mite population numbers,

and/or a suboptimal mite removal during sugar-shakes.

So it seems that the most effective mite knock-down was in colonies that received 3 or 4

treatments during the year and particularly important were the late season applications. I do want

to remind you that the California regulation for Hopguard® II states that no more than 6 strips per

colony per year may be used. Because of this you might want to stick with one initial application

earlier in the season and two later in the season if starting from packages, or, if you are splitting

your colonies, you should be able to get away with 3 consecutive applications towards the tail end

of the season, although I would have liked to see the authors take another mite count the

following spring and record colony mortality.

The results of this paper also highlight the importance of using the product when there is no or

little brood or for 3 consecutive weeks to cover the entire brood cycle. Drift between colonies

might play a role in increasing mite numbers in a particular hive. And while you can’t control

what your neighbor does, you should make sure you treat all of your colonies that need the

treatment.

Another word of caution — you don’t want to wait until your mite populations absolutely

explode in the hives in order to treat. A possibility would be to follow an IPM approach by

applying a different miticide around Hopguard® II or, if you have fewer colonies, try utilizing

physical or mechanical control such as use of screened bottom boards, drone comb removal or

creating a break in brood cycle by caging the queen or splitting your colonies. Going with Varroa

resistant/tolerant honey bee stock is yet another possibility so think about it when you’re

purchasing your next batch of queens.

The last thing I wanted to mention is a study by Vandervalk and colleagues (2014) that found

Honey Bucket and My First Honey Collection

Subscribe to The BeeKeepers Digest

Last year I left all the honey in the hives for the bees to use over the winter. This year however, early in the season I found almost a whole box of honey plus some more stored in the box below....so, some for me and some for the bees.

Typically beekeepers use a langstroth type of hive with frames that either have wax or plastic foundation on them. To collect the honey they use a hot knife to slice off the thin cappings on both sides of the frame, then put several frames in a spinning machine to use centrifugal force to spin the honey out of the comb.

In my case however I'm using Warre hives. The bees start with nothing more than a top bar from which to hang their comb, so I use the crush and strain method to separate the honey from the comb, not nearly as pretty but it gets the job done.

Step one is getting the bees out of the box of honey you want to collect. I put a bee escape below the box I wanted to collect. Check out this blog post for more details on that. I left it in place for about 10 days. Most of the bees were gone but there were some die hards that just would not give up the honey. No worries I was able to gently encourage them out as I pulled the frames.

honey comb smashed up

smashed comb

Next I found a big white bowl (color doesn't really matter) and a wooden spatula to do the smashing. I cut the comb off into the bowl (I did this away from the apiary as once the bees get the scent of honey you will be over run.) and began smashing it up. It really looks like a mess.....this is the "Crush" part of crush and strain.

Next I poured this sticky mess of honey and smashed wax into my separating system or you could also call it a Honey Bucket, not the kind you see on a construction site.....a real....honey.....bucket. This is two buckets stacked on one another. The top bucket has a nylon straining bag in it and has holes drilled in the bottom. the bottom bucket has a lid with the center section cut out of it to allow the honey from the top bucket thru. It also has a honey gate....or valve at the bottom. This system is the most natural way to collect honey as there is no filtering of the honey which could filter out pollen or other great nutrients the honey might contain. Here is a link to a couple of similar systems: Mann Lake - Brushy Mountain Bee FarmBeeThinking. I got mine from BeeThinking.

Honey Straining Bucket

Now, time to put the buckets out in the sun. Warm honey flows much better to the bucket below. ***Big note here --- When I do this again I'm going to wrap saran wrap around the seam between the two buckets. There is just enough space for bees to get in and I had to scoop several out who got in and could not get out**** By the next day all of the honey had moved to the bottom bucket leaving all of the crushed wax....and other goodies in the mesh bag above.crush and strain honey collection

Honey Bucket in the sun
Filling jars of honey the best part of beekeeping

Filling the jars

Now the fun part, pouring the honey into the jars. There are lots of choices when it comes to honey containers, jars and bottles which you can buy from most of the beekeeping suppliers. From here just make sure each jar has its cap screwed on tight and wiped down so there is no stickiness on the outside. Design and place a cool looking label on the outside and we are ready to roll.

Couple of notes; I did wash all of the jars before using them. Honey attracts moisture so if you can do much of the work in an air conditioned space the better. Too much moisture in your honey and it will spoil.

All told this first harvest was about 17 pounds of honey. The first of the jars filled with honey from seabeck farmshoney went to our bee friendly neighbors. That sounds like a lot of honey but as you can see not many jars.

I took the wax and melted it down and turned it into candles....I'll share that process in my next blog post.


Subscribe to The BeeKeepers Digest


A cool bee escape for the Warre bee hive

I have a Warre hive that overwintered this year. As a result the bees came into this season strong and ready to collect honey. The top box in my Warre stack is heavy with honey so I hope to have my first honey harvest. The challenge at hand is how to get the bees to move out of the box that I want to harvest.

Warre Bee Escape

Warre Bee Escape

There are several ways to encourage the bees to move. One is the use of a fume board. This is a cloth covered board onto which you spray or pour a chemical that really smells bad to bee noses. This drives them down the stack into the box below. Another way that I’ve read about is using a power blower. Remove the box and send a stream of air through the box blowing the bees south. Neither of these really appealed to me.

Darren from House of Bees, the craftsman that built my Warre hives, made some cool bee escapes. These give the bees a way down but due to the little maze he has made they don’t know how to get back. I’m placing the bee escape under the top box and hoping the bees will go down and out of the hive and then not come back into the box I want to harvest. Right now it is packed with bees so it will be interesting to see what happens.


The Trap is Set…….Bee Fishing

Jess and I put out a swarm trap this year. Hard to say if it will work but here are the specifics.

Swarm season in the Pacific Northwest starts in May and runs through August depending on the weather and the nectar flow. Since this is the season we figured it could not hurt to try. We used one of the swarm traps that is available from several places…we got ours from Brushy Mountain. It is made of a wood pulp type product so will wear out over time and weather. We mounted it to a piece of 2′ x 2′ plywood that I cut a handle into the top and some strap notches in the sides. The goal here is to be able to hang it from a nail (if driving a nail is appropriate) or using nylon straps to strap it around a tree trunk.

Swarm Trap in SeabeckI read lots of opinions on how to place the trap, which direction to face and how high it should be off the ground. You can get frozen in the thought process….my recommendation is just pick a place and run with it. There is always next year to try a new location. I’ve also had several stories within our club, West Sound Beekeepers Association, in which a swarm decided to move into a hive that happened to be empty but still in the yard…so I think the bees pretty much figure things out on their own.

Our hive is facing south east, so the morning sun hits the entrance and it is hanging from a nail on a post about 5 feet off the ground. I did put a piece of comb on the inside so that the smell would permeate the trap.

Stay tuned, if we catch a swarm I’ll let you know.

As you can see based on the post date it is July, we actually hung the trap the first part of June, I just didn’t get around to making a post until now. As the season wears on I’m less excited about a swarm…an old poem tells the tale:

A swarm in May is worth a rick of hay.

A swarm in June, worth a silver spoon.

A swarm in July isn’t worth a fly

I think the sentiment here is the later in the season a swarm sets up shop in a new home, the less time there is for them to draw out new comb and stock pile resources for the winter. If we were to catch one now I might just combine it back into a weaker colony.

Swarm Stories May 2013

West Sound Beekeepers Association, WSBA, George Purkett, Swarms, Beekeeper, Bees

George Purkett WSBA

On Friday a swarm came down from the sky and went into a top bar hive I was going to put a package into on Saturday. Kiva started drumming on the deck railing when she saw it swirling in the air. It quickly went into the hive. Not sure if it was already headed there or not. I spent Saturday evening and most of Sunday looking through my hives looking to see where it came from. It didn’t come from any of them.

Sunday afternoon another swarm showed up in my driveway and settled as a double clump in a fir tree. I checked all the entrances, and it also did not come from my hives. I then took the field glasses and looked at the neighbors tree. Lots of activity at that bee tree. I wonder if both swarms came from that tree?

Last year in June, I was about to set up a large colony with a cloak board for rearing queens. Unfortunately, the hive was more eager to grow queens than I. It swarmed and landed high in a tree above the apiary. The next day I watched the swarm leave and move into a hollow in a very large tree in the neighbors yard. I was saddened that the swarm left, but then realized that a WSU daughter queen just went feral in my neighborhood.

I wonder if one of the swarm queen will be marked when I check in a few days. I am also going to keep checking the sky and the trees. Maybe more previous year wayward swarms will return home.

The double clump swarm landed as two clumps and stayed as two clumps.

Usually a swarm will gather into a single clump after initially landing in a tree in multiple clumps. this one did not. Knocking two clumps of bees into buckets 15 feet straight up did not work so well. One clump went into a bucket, the other clump came raining down, oops, minor setback. All in a days fun.

Keep looking up for swarms.

George

Note: George Purkett is a key member of our bee club, West Sound Beekeepers Association. He teaches several classes and has designed this years hands on beekeeping class that over 40 beekeepers have signed up for. He posted this story on our clubs bulletin board and with his permission I’m reposting it here.

Frank


Bees going into their new beehive

A quiet bee installation

April 20th was bee day at Stedman Bee Supplies in Silverdale. The members of our bee club, West Sound Beekeepers Association, were out in force, helping to carry bee packages, answering questions and doing live bee installation demonstrations throughout the day…..a bunch of busy bees.

This year I ordered 1 package of bees to bring me back up to two hives. The Italians came in the earliest so I got those. With our short season even two or three weeks can make a big difference.

We decided to do what I call “a quiet installation”. Instead of turning the bee package upside down and dumping the bees into their new home, we instead gently turned the package upside down on top of the hive bars after having placed the queen cage between two frames in the middle of the hive. We added two boxes over the travel cage and then put the top on. It starts out looking really tall but once the travel cage is removed we are back to two boxes deep.

After 24 hours all of the bees had migrated out of their travel container and into the hive. Another 24 hours later I checked the queen cage and the marshmallow had been eaten and the queen had been released.

I think this method would work well in bad weather too……Granted, this method is not as dramatic as having a cloud of a thousand bees buzzing around you, but it worked just fine.

Bees going into their new beehive

The new package of bees

queen bee, Italian queen bee

Queen in her travel cage

queen cage, putting marshmallow in queen cage

Marshmallow in the end of the queen cage


Place queen cage in center

Place queen cage in center

Queen bee in her cage

Placing the queen cage between two frames

Turn travel cage over

Turn travel cage over


installing a package of bees into hive

Gently turning the travel cage over, hole down

Place an empty over travel cage

Place an empty over travel cage

feeding your bees, sugar water for bees, beehives

They need plenty of sugar water for now


place jar off to the side

place jar off to the side

Use up the rest from travel feeder

Use up the rest from travel feeder

Place the top on

Place the top on


Langstroth western beehive

All done for now


West Sound Beekeepers Association Hive Installation Demonstration

Joining a local beekeeping club provides lots of support, information and education….all making you a better beekeeper. The West Sound Beekeepers Association each year on bee arrival day puts on demonstrations throughout the day. This makes it easier for newer beekeepers to understand the process of moving their new packages of bees into their new home.

A 3 pound package of bees contains about 10,000 bees and one queen.

You will find other bee package installation videos here and here.

David Mackovjak does a great job not only installing this package of bees but also fielding questions from the onlookers.


The Distance a Bee Travels

It is truly amazing how far a bee will travel to find pollen, nectar, water and propolis. They will travel 3 to 5 miles in search of sustenance for their hive. When you have a bee hive you can’t think of what is blooming in your yard….rather you need to think what is in bloom in your part of the countryside. I live in Seabeck WA and as you can see my bees travel quite a bit of our zip code.

A 3 mile travel distance creates a 6 mile in diameter circle around your hives. A 3 mile radius covers 18,110 acres of ground. A farmer would be proud to be able to cover that many acres and as you know the honey bee is the fraction of the size of a human.

Apprentice Beekeeper, A License to Learn

Apprentice Beekeeper

Beekeeping Certificate

A new beekeeping season is upon us. Last year at this time I was just starting the beeginners beekeeping class. I had done a lot of reading, a lot of asking and had no real idea the adventure I was stepping into. Now, a year later our club is once again assembling those folks who would like to learn about this fascinating hobby.

This was probably one of the most important steps I took to prepare myself for beekeeping. Not only did I learn a lot about keeping bees but almost as important is that I was able to meet others who have been where I was. Our local beekeeping club, West Sound Beekeepers Association, puts on the class each year. We covered everything a new beekeeper needs to get started; equipment, bees, bee anatomy, bee pests, different types of hives, swarming, working with the bees, inspecting your hives and growing your apiary. This is also the launching point for becoming a master beekeeper. Above is my apprentice certificate, I’ve started work on the journeyman level and finally…after many years and lots of knowledge you can become a Master Beekeeper.

Additionally the club offers advanced classes, mentors, and specialized equipment to check out. Our club also has an extensive library of books and DVDs that we have either purchased or have been donated to us by our members…..a real treasure trove of information.

This should be one of your first steps, finding and joining your local bee club. If you can’t find one locally contact your state beekeeping association, they will have a list of local clubs in your area. In my area that would be the Washington State Beekeepers Association or WSBA.

This was me a year ago. I was chomping at the bit to get my first bees. This year I’m a little wiser and have the experience of one season. So much more to learn and regardless of your goals, to be a back yard beekeeper with a hive or two….or have dreams of a commercial operation….we all start here……at the beginning, what kind of bees do I buy, what kind of equipment do I use and where do I put them. And soooooo much more to learn; grafting and raising queens, splitting a hive, catching a swarm, and expanding my apiary……..Its going to be a great beekeeping season!!