The Trap is Set…….Bee Fishing

Jess and I put out a swarm trap this year. Hard to say if it will work but here are the specifics.

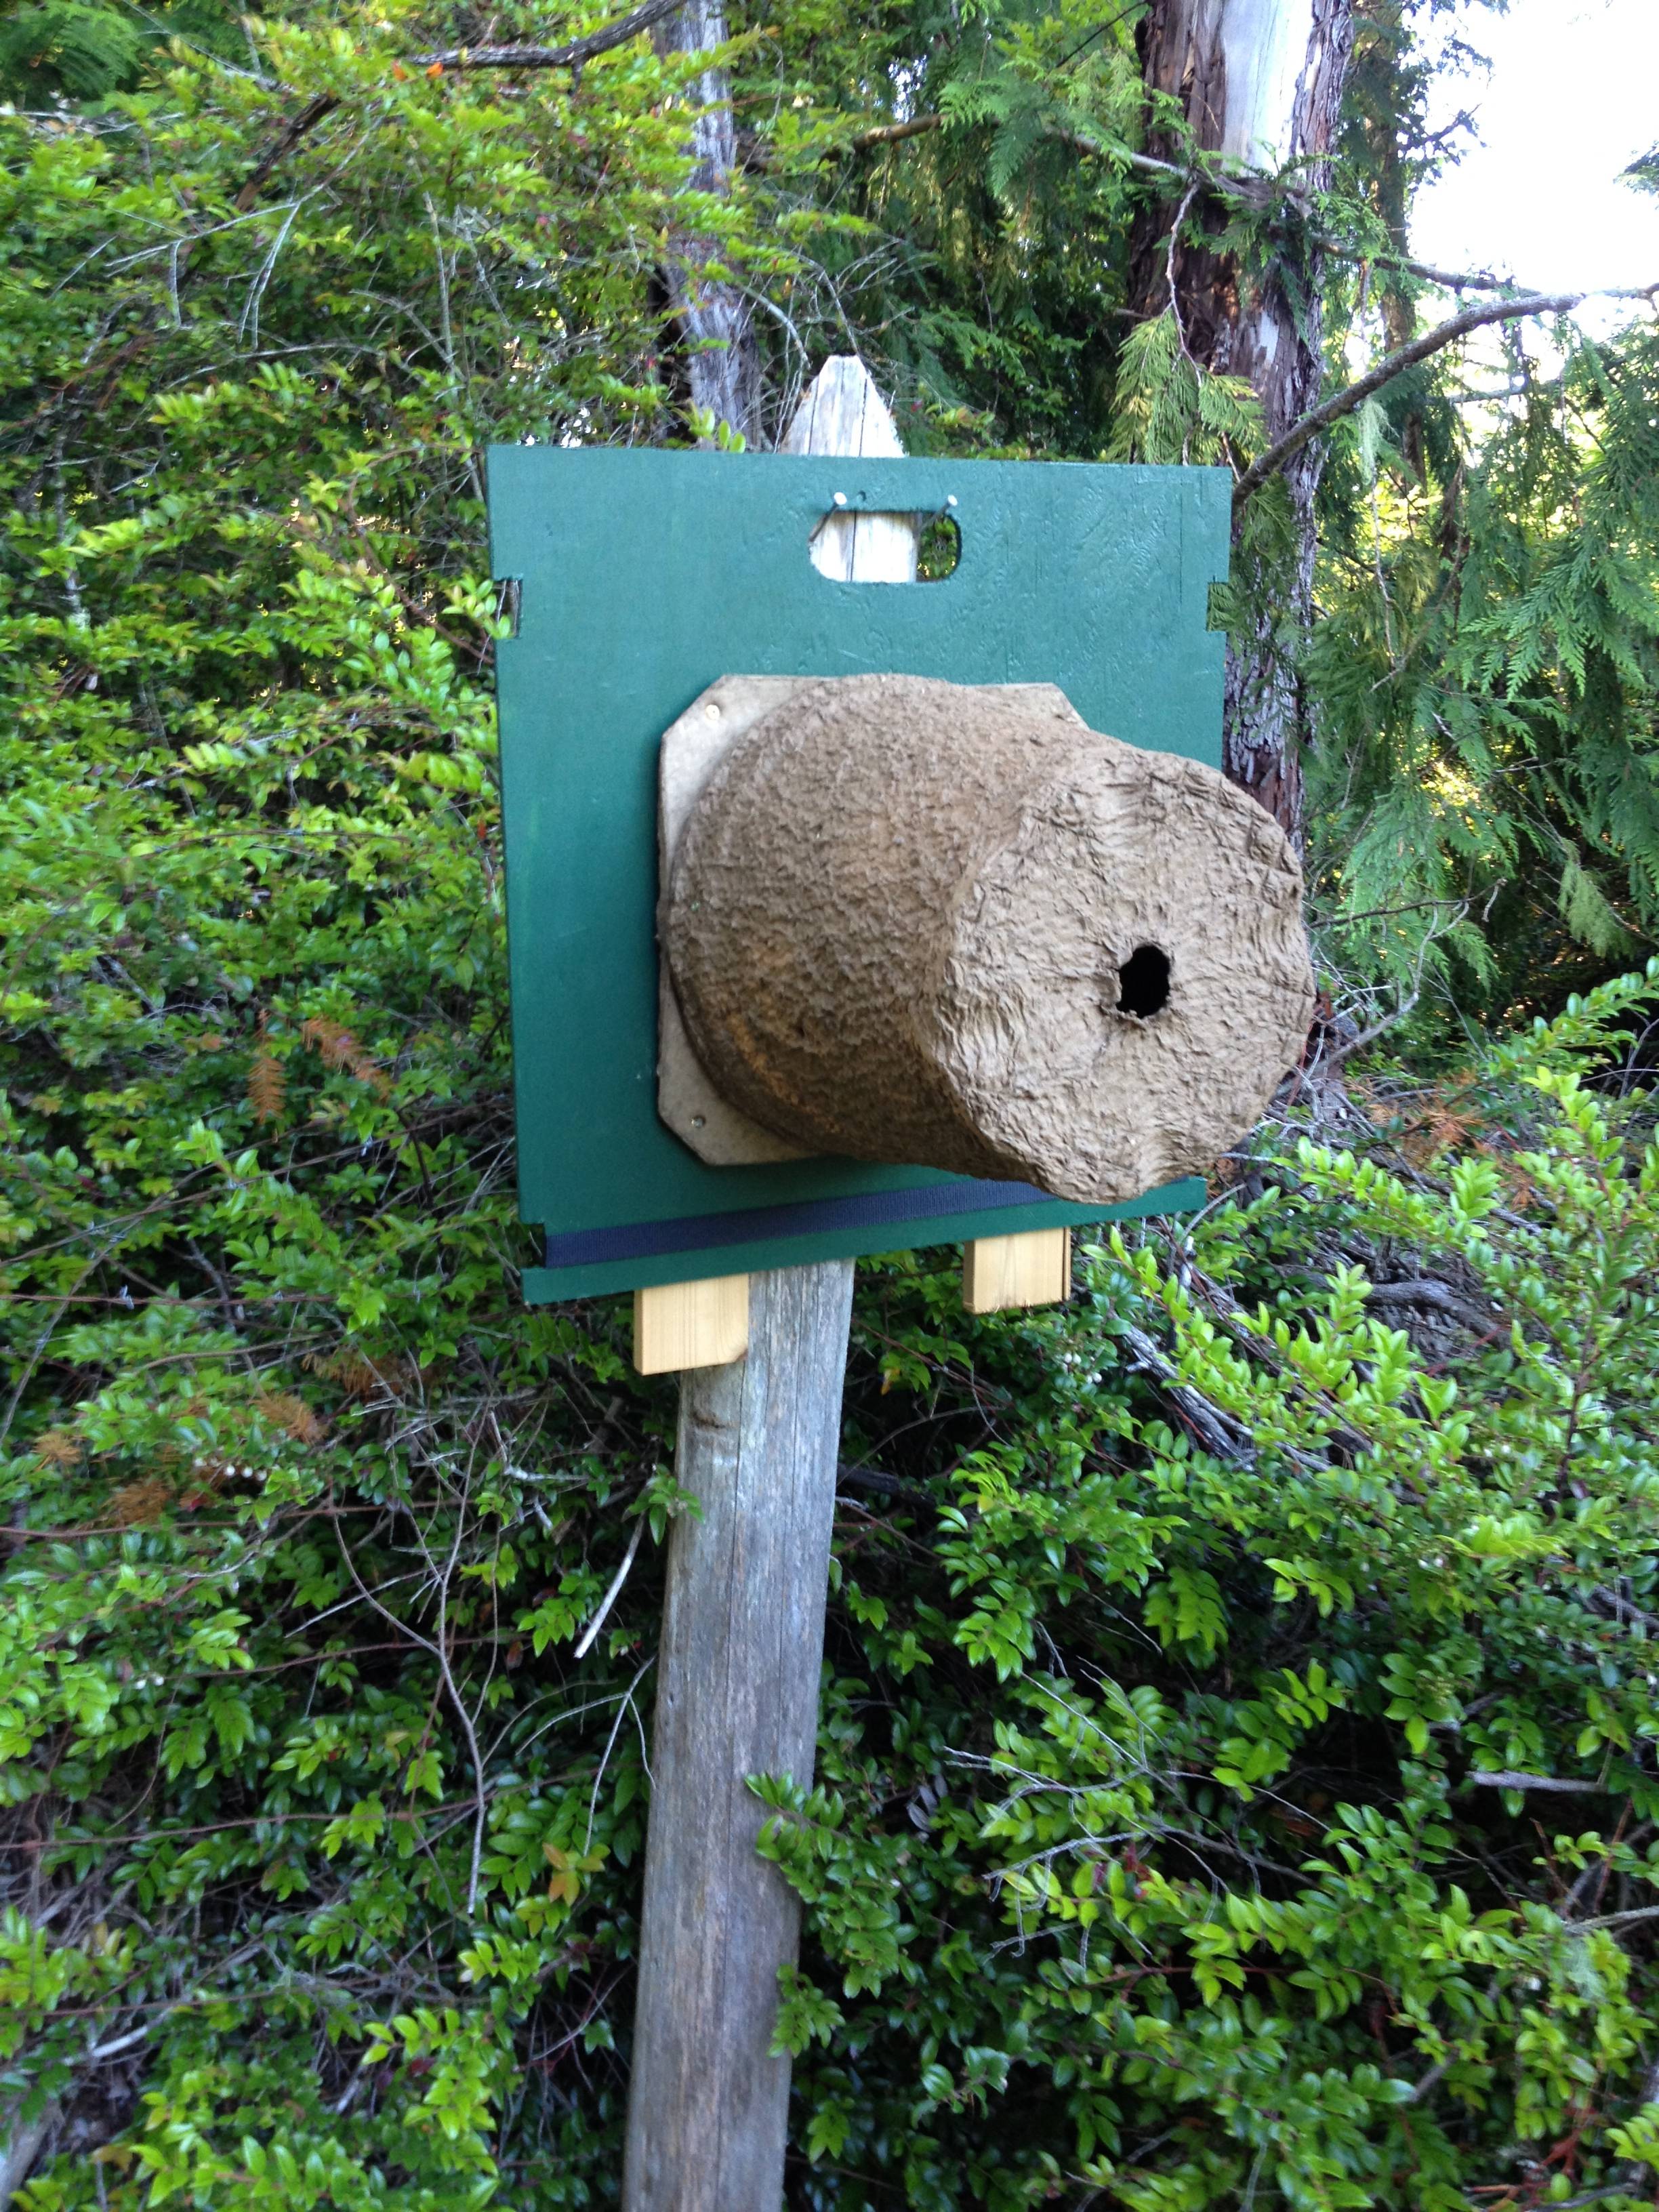
Swarm season in the Pacific Northwest starts in May and runs through August depending on the weather and the nectar flow. Since this is the season we figured it could not hurt to try. We used one of the swarm traps that is available from several places…we got ours from Brushy Mountain. It is made of a wood pulp type product so will wear out over time and weather. We mounted it to a piece of 2′ x 2′ plywood that I cut a handle into the top and some strap notches in the sides. The goal here is to be able to hang it from a nail (if driving a nail is appropriate) or using nylon straps to strap it around a tree trunk.

Swarm Trap in SeabeckI read lots of opinions on how to place the trap, which direction to face and how high it should be off the ground. You can get frozen in the thought process….my recommendation is just pick a place and run with it. There is always next year to try a new location. I’ve also had several stories within our club, West Sound Beekeepers Association, in which a swarm decided to move into a hive that happened to be empty but still in the yard…so I think the bees pretty much figure things out on their own.

Our hive is facing south east, so the morning sun hits the entrance and it is hanging from a nail on a post about 5 feet off the ground. I did put a piece of comb on the inside so that the smell would permeate the trap.

Stay tuned, if we catch a swarm I’ll let you know.

As you can see based on the post date it is July, we actually hung the trap the first part of June, I just didn’t get around to making a post until now. As the season wears on I’m less excited about a swarm…an old poem tells the tale:

A swarm in May is worth a rick of hay.

A swarm in June, worth a silver spoon.

A swarm in July isn’t worth a fly

I think the sentiment here is the later in the season a swarm sets up shop in a new home, the less time there is for them to draw out new comb and stock pile resources for the winter. If we were to catch one now I might just combine it back into a weaker colony.

Honey bees in the snow

Beehive, beekeeping, seabeck, bees, honeybees, overwintering bees

Bee hives like snow

It is December in Seabeck Washington. While our winters are very moderate compared to much of the country we do get snow from time to time. We just had two days of snow and our neck of the woods had over 10 inches. The days now are upper 30s and might get into the mid 40s this next week, the nights are in the lower 30s….in any case the snow will not last long.

A friend asked me today about the bees. What do they do when it snows? Do they hibernate?

This is the 6 million dollar discussion. How do you get the bees through the winter. This is the crux of what so many beekeepers struggle with each year. It is not unusual to have a 30 to 50% loss each year.

The bees do not hibernate. I consider hibernation like a sleep state. Bees remain active throughout the winter. They generate heat with the same muscles they use to fly. They flex or pump their mucsels in such a way that they maintain a core temperature of about 89 to 97 degrees F.

During warm weather bees come and go from the hive. Collecting and returning with pollen, nectar  water or sap. They also leave for cleansing flights as they do not defecate in their hive.

At about 64 degrees F the bees begin to cluster, that is collect closely together to preserve heat. There are two basic parts of the cluster; the core which uses its muscles to create the heat and the outer layer that acts as insulation for the core. As temperatures drop the cluster tightens. The bees rotate from the inner part of the cluster to the outer, taking turns generating the heat. The energy they use is fueled by the honey they eat or the sugar the beekeeper has given them if they do not have sufficient honey stored.

The queen slows down egg laying and stops all together for a short time all to preserve energy and make it through the winter. Some think that the winter solstice is what keys the queen to begin to slowly build up the brood again.

Beekeepers in areas with harsher winters may actually wrap their hives to better insulate them, making it easier on the bees. The typical advice when it snows is to leave the snow on the top of the hives, it acts as an insulator.

My goal now is to just check them on warmer days and ensure they have plenty of sugar….and hope I don’t suffer the 30 to 50% loss that others have.

Thank you Lee for this great question.


Resource for information in this post came from here: http://www.capabees.com/main/files/pdf/winteringpdf.pdf

Preparing your beehives for winter and building sugar boards

As I approach my first winter in beekeeping the biggest hurdle yet to overcome is keeping my bees alive throughout the winter. Even the most experienced beekeepers struggle with this. So I’ve set some milestones for myself and will go into this season on purpose…so that if I completely blow it I’ll at least know what not to do next year.

My goal: have all 3 hives alive on April 1, 2013.

Going into the winter it is important to have plenty of stores for the bees. Ideally I’d like to have about 50 pounds of honey in the comb so that the bees have plenty to eat. It is also important to have a low verroa mite load so that the bees have a good chance of making it.

I checked my hives a few weeks ago and as usual…good news and bad news. The good news is that I seem to have a low mite count. In one hive I have 25 mites that dropped in a 24 hour period and on the other only 14. My target was less than 24 mites per 24 hour period….I think I’m good on this issue.

On stores…..not so much. Very little honey in the comb. 2 to 3 frames in one and less than that in the other. The nuc has maybe one full frame of honey.

My plan of action based on my hive inspection:

1) no mite treatment

2) Feed sugar water through Oct then switch to sugar and pollen patties.

The reason you cannot feed sugar water all winter is because the ambiant moisture is so high the bees would not be able to store the sugar water in the comb and then get it down to below 18% humidity. Anything above 18% and it will spoil giving the bees dysentery.

Above is a video showing how I built the sugar boards. A nice 1 day project to improve the chances your bees will survive the winter.


The Annual Driving of the Drones

Driving of the drones, the movie

Each year the drone bees are driven from the beehive in preparation of winter. Since the males serve no purpose to the hive other than mating services, as winter approaches they are quickly identified as consumers and are driven away to preserve the food set aside for winter.

Some specifics of a drone bee:

The drones are male

They are larger than the female

The drone typically has a dark or black abdomen

Only about 2 to 4% of the total hive population is male

The drones have large eyes

The main function of a drone bee is to mate with a queen bee. Since mating happens “on the wing” the large eyes allow a better chance for the male to spot the queen in the air so that he might mate with her. This is his only function. The drone bee does nothing in the hive, no house keeping, rearing of the young or foraging. In fact the male does not even have a stinger. A honeybee hive is a female dominated society.

What you will see in the video:

Bees coming and going

Some of the bees will be carrying pollen in the pollen baskets on their rear legs.

The largest bees are the male or drone bees.

You will see the females chasing drones out of the hive or over the edge of the landing platform.

You will see females riding the drones, though they typically do not sting the drones they are known to damage the drones wings and inflict damage on them that will disable them.

It is not uncommon to see females drag undeveloped male larvae out of the nest as fall approaches.

The driven drone will usually only last a few days outside of the hive. The cooler temperatures, predatory birds and other insects will typically aid in the final chapter of a drones life. It is not until next spring that the queen will once again begin laying male eggs to begin the cycle anew.

Watch carefully as the large male bees are escorted, driven, herded and cajoled out of the hive by the females.


Adapter to allow inserting a warre frame into a langstroth hive

Easy way to shift Warre top bars to a Langstroth Nuc

Though there are many positive aspects to Abbé Émile Warré (1867-1951) beehive design, one of the drawbacks is the incompatibility between it and other hive systems. As I’m learning more and more about starting splits, queen rearing and using nucs in the classes offered by West Sound Beekeepers Association I’m seeing how much of a hassle it is to work between Warre and Langstroth hives.

In this particular case I wanted to start a split using several frames of brood and pollen and several frames of honey. Typically you would take these from one or more strong hives and just move the frames into a nuc, however the Warre bars are quite a bit shorter than the Langstroth nuc…so what to do….what to do?

Adapter to allow inserting a warre frame into a langstroth hive

Warre frame adapter

One option is to build an adaptor. This will allow you to slide the smaller Warre bar with its comb into a frame that will then fit into a Langstroth nuc. Fortunately for me I have a friend/fellow beekeeper who is a master wood worker. Darren, House of Bees.com, built a slick frame that allows just that. You can see to the side what it looks like.

Another option is one I devised on the fly before Darren proposed his Warre adapter. Simply take the top bar of aLangstroth frame and

Zip ties to connect warre top bar to a langstroth beehive frame

Zip ties used to attach larger langstroth bar to a warre topbar

beekeeping warre bee hives
zip tie connecting the two bars

lay it along the top of the Warre bar. Run two zip ties through the comb and around cinching the two top bars together. Then simply hang the combination into your nuc or other Langstroth hive. As you can see in the photo the bees are more than happy to fill in the space.

The big difference between the two approaches is that Darrens adaptor can easily be undone if you wanted to move the Warre bar back into a Warre box. My zip tie method would be a little messier.

Honey comb, Warre beehive, Langstroth bee hives

Bees have filled in the space around the warre topbar


Building a foundation for your beehives

Bees, you can’t eat just one….

I think I might have the Lays Potato chip syndrome when it comes to bees. I started out with two hives, after all, that is what all the books say to do. This way you can compare one to the other and get a better understanding of bees and how they live. That was in class #1. It is only in class #6 do you learn about swarming.

Swarming is a colonies natural instinct to ensure survival of the colony and despite man’s best efforts you will usually have a swarm in at least some of your hives. So, this means I should probably have a couple of hive bodies and some frames set aside just in case I come home from work one day to a buzzing mass of beemanity in my yard (read more likely my neighbors yard) and have some plan in place to deal. It is a natural extension that if I have to add a hive I’m going to need someplace to keep it….so here is a list of what I did and how I set up two more foundations. This is very similar to setting up my original two but these are a little bigger. You can read that post by clicking here.

The reason these foundations are bigger is because I’ve decided to go with 8 frame westerns as I expand my apiary. I purchased a nuc from brushy mountain and 5 unassembled western 8 frame boxes from Mann Lake. I think this will allow maximum flexibility with dealing with a swarm and swapping frames from hive to hive if I need to. To accomodate the larger hives here is my parts list for two foundations:

4 16x16x2 cement pavers

8 8X16X6 concret blocks

Left over bag of sand from my first two foundations

I like to use the 16×16 pavers because they are easier to level, then put the concret blocks on top to give me a little height and to allow me to run a web strap over the hive and through the concret blocks. This will add some stability in the winter time when the winds pick up.

So this year I may end up with 3 or 4 hives….what happens next year if say 2 or 3 of the hives swarm….there you go….you can’t eat just one 🙂


Honey bees seem to love scotch broom. Beekeepers see this annually in the pacific northwest.

Cheeto Bees

Scotch Broom a plant that flowers in May and covers honey bees to look like Cheetos

Cheeto bees are a common site this time of year in the Pacific Northwest. You do not have to look far to see a field of scotch broom in bloom. Once thought of as a good idea to   plant along our freeways now many people see this as an invasive plant that is not native to our area.

I’ve read several articles that indicate that honey bees do not like scotch broom, yet the ones I see in our neighborhood usually have bees around them and they sure come back to the hive covered in yellow, almost like they had been playing in a bag of Cheetos.

A bee from the beekeepers digest apiary

Cheeto bee

Half of a kilo a day habit…..these bees

After one week I opened up the hives to see how the bees were doing. The hive with flowers, the one with Italians were building comb but not at the same rate as the other hive with the Carniolan queen.

Smoking a beehive in Seabeck WA

A little smoke to keep them calm

I’d guesstimate that the Italian hive had some comb on maybe 4 of the bars with the Carniolan colony having comb on probably 6 of the bars. Easily twice as much comb produced in the Carni hive. You can see that the carniolan hive built the queen cage right into the comb. I was afraid of removing it for fear of weakening the structure. Once this bar is fully drawn out I’ll see if I can carefully extricate the queen cage.

I don’t know if this is just the difference between two hives or a specific difference between an Italian queen and a Carniolan queen. This is something I’ll have to watch in the future.

I’m finding that they are going through almost a full bottle of sugar water in 24 hours, which is about half of a kilo of sugar. I’m mixing my sugar on a one to one ration. 1 liter of warm water with 1 kilo of white sugar.

It also appears that in both cases only about 15% of the bees are in and out of the hive, the balance are all focused on comb building. I’m wondering if this will shift as the comb gets built out and perhaps I’ll see more bees foraging.

beehive honey comb

Honey comb built out on one bar in first week

Second bee package installation

This second installation went much smoother than my first. Some points that made it smoother:

1) I put the feeding bottles in the attic and closed it all up before starting the installation. This kept bees from getting into a no bee zone. When done I just picked the whole thing up and put it in place.
2) I put a cloth over the package when I removed the feeding can. This kept a cloud of bees from forming…making it a little less hectic for me.
3) I put the cloth on the top of the hive before putting on the attic. This encouraged the bees to move below the top of the top bars to reduce squishage. (technical term :))
4) This was my second time so I felt a little more confident.

I was at first concerned that I was not able to shake all of the the bees out of the package and into the hive. I found that by just placing the open package by the entrance of their new home that they migrated nicely into the new hive. I came by a few hours later and just picked up the empty box that the bees arrived in. Of course I’ll want to return this to Steadman’s so they can recycle the bee package for next year.

Since it will probably be a while before I do another package installation I’ll want to review this video and notes to get back up to speed before doing the next one.

Spring Bee Packages Arrived, Installation of bees into a new hive


FINALLY…..it seemed a long wait for the bees to arrive. I started reading, studying and researching everything about bees since October or so and now I’m finally a “beekeeper”. I can tell you first hand, despite all the research and discussion, nothing prepares you for the first time you unleash 10,000 bees into an open hive. Even with the bee suite on I kept thinking…..what if they turn on me????

Well, of course they didn’t. They are every bit as gentle as you treat them. I did get stung twice but both were my fault. One girl stung me because she got trapped under the wrist band of my watch (lesson..don’t wear that again) and the second bit me because I was not looking at what I was grabbing. I turned to pick up the top of the hive, grabbed it without looking and got stung for my carlessness.

This video is the installation of the first package into a new Warre hive. These are Italians. I also purchased a package of Carniolans which I installed the next day. I’ll post that video in the next week or so.

They have both settled nicely into their new homes and are drinking lots of sugar water as it is still pretty rainy.

Please feel free to comment below and link back if you have a website about bees that you have found interesting.