The Annual Driving of the Drones

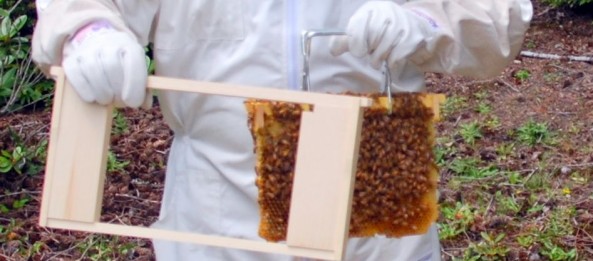
Driving of the drones, the movie

Each year the drone bees are driven from the beehive in preparation of winter. Since the males serve no purpose to the hive other than mating services, as winter approaches they are quickly identified as consumers and are driven away to preserve the food set aside for winter.

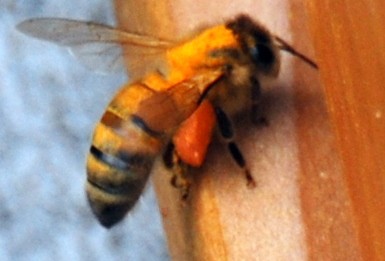
Some specifics of a drone bee:

The drones are male

They are larger than the female

The drone typically has a dark or black abdomen

Only about 2 to 4% of the total hive population is male

The drones have large eyes

The main function of a drone bee is to mate with a queen bee. Since mating happens “on the wing” the large eyes allow a better chance for the male to spot the queen in the air so that he might mate with her. This is his only function. The drone bee does nothing in the hive, no house keeping, rearing of the young or foraging. In fact the male does not even have a stinger. A honeybee hive is a female dominated society.

What you will see in the video:

Bees coming and going

Some of the bees will be carrying pollen in the pollen baskets on their rear legs.

The largest bees are the male or drone bees.

You will see the females chasing drones out of the hive or over the edge of the landing platform.

You will see females riding the drones, though they typically do not sting the drones they are known to damage the drones wings and inflict damage on them that will disable them.

It is not uncommon to see females drag undeveloped male larvae out of the nest as fall approaches.

The driven drone will usually only last a few days outside of the hive. The cooler temperatures, predatory birds and other insects will typically aid in the final chapter of a drones life. It is not until next spring that the queen will once again begin laying male eggs to begin the cycle anew.

Watch carefully as the large male bees are escorted, driven, herded and cajoled out of the hive by the females.


Adapter to allow inserting a warre frame into a langstroth hive

Easy way to shift Warre top bars to a Langstroth Nuc

Though there are many positive aspects to Abbé Émile Warré (1867-1951) beehive design, one of the drawbacks is the incompatibility between it and other hive systems. As I’m learning more and more about starting splits, queen rearing and using nucs in the classes offered by West Sound Beekeepers Association I’m seeing how much of a hassle it is to work between Warre and Langstroth hives.

In this particular case I wanted to start a split using several frames of brood and pollen and several frames of honey. Typically you would take these from one or more strong hives and just move the frames into a nuc, however the Warre bars are quite a bit shorter than the Langstroth nuc…so what to do….what to do?

Adapter to allow inserting a warre frame into a langstroth hive

Warre frame adapter

One option is to build an adaptor. This will allow you to slide the smaller Warre bar with its comb into a frame that will then fit into a Langstroth nuc. Fortunately for me I have a friend/fellow beekeeper who is a master wood worker. Darren, House of Bees.com, built a slick frame that allows just that. You can see to the side what it looks like.

Another option is one I devised on the fly before Darren proposed his Warre adapter. Simply take the top bar of aLangstroth frame and

Zip ties to connect warre top bar to a langstroth beehive frame

Zip ties used to attach larger langstroth bar to a warre topbar

beekeeping warre bee hives
zip tie connecting the two bars

lay it along the top of the Warre bar. Run two zip ties through the comb and around cinching the two top bars together. Then simply hang the combination into your nuc or other Langstroth hive. As you can see in the photo the bees are more than happy to fill in the space.

The big difference between the two approaches is that Darrens adaptor can easily be undone if you wanted to move the Warre bar back into a Warre box. My zip tie method would be a little messier.

Honey comb, Warre beehive, Langstroth bee hives

Bees have filled in the space around the warre topbar


Building a foundation for your beehives

Bees, you can’t eat just one….

I think I might have the Lays Potato chip syndrome when it comes to bees. I started out with two hives, after all, that is what all the books say to do. This way you can compare one to the other and get a better understanding of bees and how they live. That was in class #1. It is only in class #6 do you learn about swarming.

Swarming is a colonies natural instinct to ensure survival of the colony and despite man’s best efforts you will usually have a swarm in at least some of your hives. So, this means I should probably have a couple of hive bodies and some frames set aside just in case I come home from work one day to a buzzing mass of beemanity in my yard (read more likely my neighbors yard) and have some plan in place to deal. It is a natural extension that if I have to add a hive I’m going to need someplace to keep it….so here is a list of what I did and how I set up two more foundations. This is very similar to setting up my original two but these are a little bigger. You can read that post by clicking here.

The reason these foundations are bigger is because I’ve decided to go with 8 frame westerns as I expand my apiary. I purchased a nuc from brushy mountain and 5 unassembled western 8 frame boxes from Mann Lake. I think this will allow maximum flexibility with dealing with a swarm and swapping frames from hive to hive if I need to. To accomodate the larger hives here is my parts list for two foundations:

4 16x16x2 cement pavers

8 8X16X6 concret blocks

Left over bag of sand from my first two foundations

I like to use the 16×16 pavers because they are easier to level, then put the concret blocks on top to give me a little height and to allow me to run a web strap over the hive and through the concret blocks. This will add some stability in the winter time when the winds pick up.

So this year I may end up with 3 or 4 hives….what happens next year if say 2 or 3 of the hives swarm….there you go….you can’t eat just one 🙂


Honey bees seem to love scotch broom. Beekeepers see this annually in the pacific northwest.

Cheeto Bees

Scotch Broom a plant that flowers in May and covers honey bees to look like Cheetos

Cheeto bees are a common site this time of year in the Pacific Northwest. You do not have to look far to see a field of scotch broom in bloom. Once thought of as a good idea to   plant along our freeways now many people see this as an invasive plant that is not native to our area.

I’ve read several articles that indicate that honey bees do not like scotch broom, yet the ones I see in our neighborhood usually have bees around them and they sure come back to the hive covered in yellow, almost like they had been playing in a bag of Cheetos.

A bee from the beekeepers digest apiary

Cheeto bee

Second bee package installation

This second installation went much smoother than my first. Some points that made it smoother:

1) I put the feeding bottles in the attic and closed it all up before starting the installation. This kept bees from getting into a no bee zone. When done I just picked the whole thing up and put it in place.
2) I put a cloth over the package when I removed the feeding can. This kept a cloud of bees from forming…making it a little less hectic for me.
3) I put the cloth on the top of the hive before putting on the attic. This encouraged the bees to move below the top of the top bars to reduce squishage. (technical term :))
4) This was my second time so I felt a little more confident.

I was at first concerned that I was not able to shake all of the the bees out of the package and into the hive. I found that by just placing the open package by the entrance of their new home that they migrated nicely into the new hive. I came by a few hours later and just picked up the empty box that the bees arrived in. Of course I’ll want to return this to Steadman’s so they can recycle the bee package for next year.

Since it will probably be a while before I do another package installation I’ll want to review this video and notes to get back up to speed before doing the next one.

Spring Bee Packages Arrived, Installation of bees into a new hive


FINALLY…..it seemed a long wait for the bees to arrive. I started reading, studying and researching everything about bees since October or so and now I’m finally a “beekeeper”. I can tell you first hand, despite all the research and discussion, nothing prepares you for the first time you unleash 10,000 bees into an open hive. Even with the bee suite on I kept thinking…..what if they turn on me????

Well, of course they didn’t. They are every bit as gentle as you treat them. I did get stung twice but both were my fault. One girl stung me because she got trapped under the wrist band of my watch (lesson..don’t wear that again) and the second bit me because I was not looking at what I was grabbing. I turned to pick up the top of the hive, grabbed it without looking and got stung for my carlessness.

This video is the installation of the first package into a new Warre hive. These are Italians. I also purchased a package of Carniolans which I installed the next day. I’ll post that video in the next week or so.

They have both settled nicely into their new homes and are drinking lots of sugar water as it is still pretty rainy.

Please feel free to comment below and link back if you have a website about bees that you have found interesting.

Video showing break down of the Warre beehives that we are starting out with.

Several people have asked me about the details of the hives that we are using here in Seabeck. Here is a video that Darren from House of Bees put together that shows all of the aspects of this hive.

Darren does an excellent job with the craftsmanship of these hives.

You can also purchase plans from him if you want to do it yourself…click here for that link.

Bees need a balanced diet too.

CCD or Colony Collapse Disorder seems to be a title that man has put on a multifaceted problem. Of course this fits nicely with our overall need to seek “the one thing”. The one pill that will make us thin, the one idea that will make us rich, the one secret to living a fulfilled life, the one exercise that will melt away love handles.

The more reading I do and the more people I talk with leads me to believe that CCD is not one ailment but rather a series of deficiencies that lead up to the demise of what was thought to be a healthy bee colony.

Though I’m not a scientist, nor do I have a laboratory in my basement…that would be cool though, I can sift through lots of data that others have collected and make sense of it. See the logic (at least my logic) and draw some conclusions.

Painted Backyard Beehive

Backyard Beehive

While reading this last issue of American Bee Journal I came across an article that made sense to me. The article by Peter Loring Borst speaks to a bees diet and covers a lot of great information about pollen and its food value. But one part jumped out at me specifically.

Two groups of bees were analyzed. One that was on a monofloral  diet (one crop of plants, one primary source of pollen like huge fields of soy, or large groves of almonds) and bees who were eating a polyfloral diet (variety of plants around the hive, no one predominant pollen source).  Both diets produced what the bees needed to be healthy and active in this life cycle….however bees that were on the monofloyral or restricted diet produced a smaller amount of an enzyme called glucose oxidase (GOX).

Glucose oxidase is an enzyme that converts sucrose into an antiseptic that we are all familiar with called hydrogen peroxide. The hydrogen peroxide is used by the bees in honey and larval food production to help reduce the growth of bacteria and pathogens.  So, while the bees on a monofloral diet that are currently flying might be healthy, the next generation of bees may well have a weakened immune system due to being fed food with higher levels of bacteria.

The bees on the polyfloral, or balanced diet, on the other hand, produced greater levels of GOX, which would provide for food with lower levels of bacteria or pathogens thus producing new offspring with normal immune systems.

While there are many other factors out there that lead to the loss of a colony; weather, pesticides, pests, starvation and the beekeeper, providing a balanced source of pollen and nectar for your bees will give them the strength to deal with all the other threats against them.

Those of us that are into back yard beehives may well have the best chance of providing for a balanced diet for our bees. Just look around your neighborhood and I’m sure you will see lots of variety.

Painting your new bee hives

Painting our hives

We spent the weekend getting our two warre hives ready. Bees will be here in 3 weeks or so. I’ve seen quite a bit written about painting your bee hives so to save you the time here is what I’ve reduced it down to:

Color: color does not really matter though keep in mind that light colors reflect the heat away from the hives and dark colors attract the heat. For me, where I live the darker the better as beeks in our area seem most concerned with keeping their bees alive throughout the winter. If you only have a couple of hives you can afford to get decretive. In our case my wife is painting one and I’m doing the other. She is planning a colorful design while mine will look like a log house, green roof and golden brown sides. If you had 20 hives to paint I’d recommend a spray gun or roller to cover as much territory as quickly as possible….maybe that is one of the benefits of being a backyard beekeeper, small scale.

Type of paint: Latex, water based exterior paint. Low VOC would probably be the best but if you used regular VOC paint and let them sit for a few weeks I’m sure there would be no problem. Stay away from oil based paints. In our beekeepers class they really pushed for you to use leftover paints that you or a neighbor might have left over from your last project.

What to paint: Just paint the outside. Do not paint anything the bees will be living on. Your goal is to protect the wood from the elements while realizing that over a few years your hives will age. All of the bars, frames, inside walls, ceiling and floor should be untreated wood.

My warres are 16” x 16” so I’m putting down a 16 x 16 inch square paver that I’ll level with sand underneath and then on top of the paver I’m placing two 16 x 8 in cinder blocks side by side with the holes on the side. This way if it is getting stormy I’ll be able to run a nylon strap around the stack and through the cinder blocks to add stability.

I’ll post pictures of the paint job as well as how I have them placed in the yard next week.

Time never goes so slow as when you are waiting for your first package of bees…..

A look inside a Warre Beehive

Active Warre Beehive With Observation Window

warre Beehive, bees, honeycomb, Warre Hive

Click for a larger view

This Warre beehive sits on the front porch of Darrens house (www.houseofbees.com). This colony was collected from a swarm and seems to be doing well so far as we move into the fall. A little closer look at the window shows what is going on with the comb that has been built. Notice how it is built right out to the glass. Bees are amazing at winterizing their home and stopping any unwanted drafts so that it is easier for them to control the temperature.